
Street Photography in Valletta, Malta: Early Starts & Hidden Gems
Some tips and ideas for street photography in Valletta, Malta, based on my own experiences from a trip in 2025. Valletta offers original photo opportunities beyond the overcrowded tourist hotspots if you arrive early and are prepared to head off the beaten track and get a little bit lost.
Street photography in Valletta, Malta, is a dream for any photographer seeking authenticity, history, and striking light. With its narrow limestone alleyways, colourful balconies, and baroque architecture, Valletta offers a rich canvas for storytelling. But to capture the city’s true essence, timing and location are everything.
Avoiding the crowds is crucial for powerful street photography in Valletta. Cruise ships and day-trippers can fill the main streets by mid-morning, so getting there early is essential. Aim to arrive just after sunrise, when the golden light hits the stone facades and the city begins to stir. You'll find locals opening shops, street sweepers finishing their rounds, and a calm, cinematic atmosphere perfect for candid shots.
To elevate your street photography, get off the beaten track. While Republic Street and Merchant Street are iconic, they’re often saturated with tourists. Instead, wander into the quieter side alleys and residential quarters like the lower parts of St. Ursula Street or the back lanes near Hastings Gardens. Here, you'll encounter everyday Maltese life—residents chatting on doorsteps, kids heading to school, or fishermen repairing nets.
For truly original results in your street photography, look beyond the obvious. Focus on shadows, textures, and fleeting expressions. Valletta’s layered history and changing light offer endless compositions for creative street photographers willing to explore.
Remember, patience and presence are key. The best street photography in Valletta isn’t found in guidebooks—it’s captured in those unscripted, quiet moments when the city reveals itself.
So grab your camera, get there early, avoid the crowds, and let Valletta’s hidden corners inspire your next photographic story.
Check out the results of my early morning trip in May below. There are shots of the colonial heritage (obligatory for me as a Brit) with the postbox and phone box. I saw examples of the post box on the web and thought that some AI had been used because the reflection on the left of the box looks weird. But this is indeed what you get early morning when the light is bouncing off the wall on the left back on to the left-hand side of the box. The shot of the balconies was an attempt to capture the architecture without any of the hustle and bustle below, so look up! The model photoshoot was sheer luck. I spotted her approaching, then saw the photographer so just held back and took some discreet shots. The final shot is a door that is so unused that dust has gathered on it an people have started writing messages in it. The square of light shining off it shows just how much variation in light you can get throughout the day. It’s probably no coincidence that the shots are all vertical. I shot horizontal photos as well in Valletta but the narrow streets mean that vertical shots naturally work better.


Five must-see photo locations in Malta and Gozo for 2025: Hidden gems and iconic views
Explore the best photography spots in Malta and Gozo for 2025, including Il-Karraba Ridge, Valletta's architectural marvels, and the Marsalforn Salt Pans. Perfect for landscape and architectural photography lovers.
I visited Malta and Gozo in early May. For someone who lives in a landlocked country, the opportunity to explore an island that measures less than 30km long and 15km wide, plus the smaller island of Gozo, offers numerous opportunities to combine coastal landscape photography with historical architecture and some unusual urban photography. Despite iconic photo locations such as the Azure Window collapsing in recent years due to natural erosion, Malta and Gozo continue to captivate photographers with their natural beauty. If you're planning your 2025 photo journey through these Mediterranean gems, here are five must-visit photo locations based on my own experience on-location.
1. Il-Karraba Ridge, Għajn Tuffieħa – Sunset Spectacle by the Sea
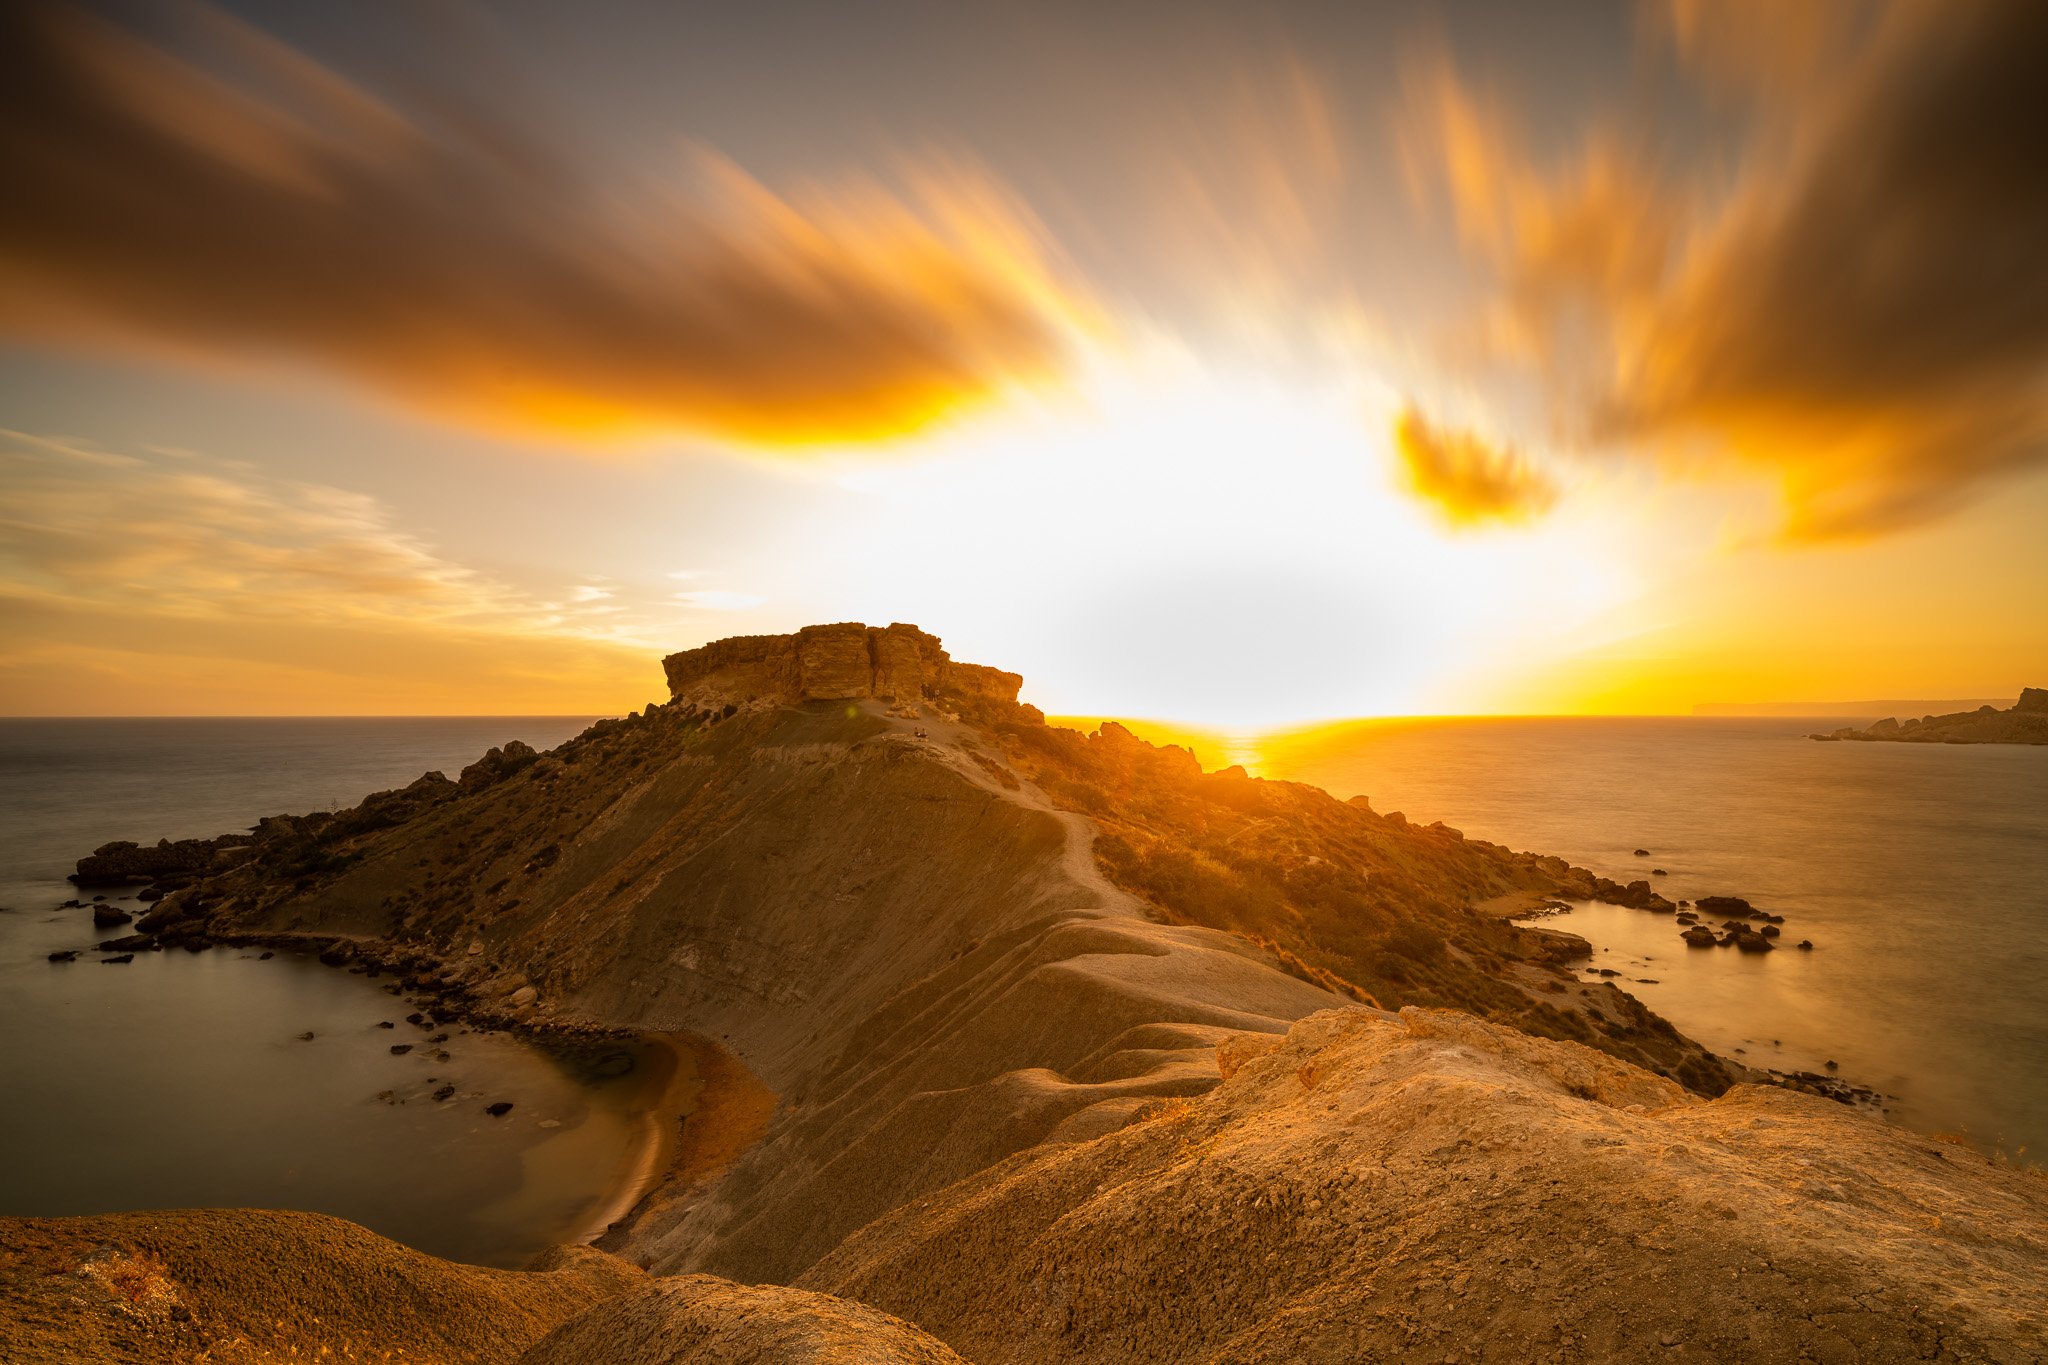
Il-Karraba ridge at sunset. Nikon Z7ii, 14-30mm f4. Shot at @20mm, f8, ISO 100, 25 seconds.
Nestled between Għajn Tuffieħa Bay and Ġnejna Bay, Il-Karraba Ridge offers one of Malta's most breathtaking coastal landscapes. This clay cliff formation is a dream for sunset photography. The unique terrain, combined with the golden Mediterranean light, provides endless compositional opportunities—from minimalist silhouettes to sweeping wide-angle shots. The cracked soil in particular offers endless opportunities to create leading lines. I faced the usual challenge of an underexposed foreground and an overexposed background, adding my own layer of complexity by shooting long exposures. A tripod and filters are essential here, and my trusted graduated neutral density filter helped to take out some of the highlights. In my final edit I deliberately kept some of the blown highlights for a pretty aggressive look. As this spot faces west, it attracts a lot of people for the sunset. Get there early, take some time to scout for a good spot and then wait. I stayed in the same spot for around an hour.
2. Parliament Building, Valletta – Architectural Geometry
Designed by renowned architect Renzo Piano, Valletta's Parliament Building is a masterpiece of contemporary architecture harmonizing with Malta’s traditional limestone aesthetic. Its bold geometric façade creates compelling patterns, perfect for architectural and abstract photography. The stairs on the right-hand side of the building offer great potential for some candid street photography if you can catch people at the right time as the sun casts a diagonal shadow across the stairs. Unfortunately, the hordes of tourists groups and cruise ship visitors seem to head straight down the main street and miss this architectural marvel. I did all my Valletta shots relatively early in the morning and the light was great. I deliberately take only my 50mm prime lens for street photography because it forces me to consider my composition. In this case I honed in on the façade to highlight the intriguing shapes and geometric patterns.

A close-up of the façade of the Parliament Building in Valletta. Nikon Z7ii, 50mm f1.8. Shot at f8, ISO 160, 1/640 seconds.
3. Marsalforn Salt Pans, Gozo – Ancient Grids at Golden Hour

The salt pans at Marsalform shot at sunrise. Nikon Z7ii, 14-30mm. Shot at 30mm, f8, ISO 64, 1/250 seconds.
Located on Gozo’s northern coast, the Marsalforn Salt Pans are not only culturally significant but also visually mesmerizing. Carved into the coastal rock and still in use today, these salt pans offer a striking checkerboard pattern that reflects the changing sky. The coast here runs east to west and I got there in time for sunrise. There was not much in the way of a golden hour but if you have a polarising filter you can catch the early-morning sun reflecting off the pools. This is a protected site so you cannot simply wander around the salt pans looking for the best composition. There is a concrete pathway half-way along the coast where you can set up to look east for the sunrise. But as always with sunrises, don’t forget to look behind you as the sun lights up the coast looking westwards.
4. Typical Maltese architecture
You cannot fail to notice the typical style of Maltese appartment blocks with their distinctive coloured protrusions. Taking a street photography approach and armed only with my 50mm prime lens, I wanted to capture only this essential element of the Maltese style, without any extraneous details. If you wander around Valletta early in the morning and frame your shot looking upwards, even if you are surrounded by tourists and traffic, you can capture a moment in time that features none of them.

No self-respecting building in Malta is complete without a brightly painted wooden extension pinned to its façade. Look up, find the colours and shoot. Nikon Z7ii, 50mm f1.8. Shot at 50mm, f8, ISO 160, 1/640 seconds.
5. The red tower and sunset by an old NATO radar station
If you plan well and scout your locations in advance, you can get two good golden hour and sunset shots here. The first is the striking St. Agatha’s Tower, whose dark red adobe-style finish comes alive in the orange glow of golden hour. Head further down the road to the very end and, if you wander around a bit, you can find several composition to catch the setting sun.

An evening shot of the Red Tower in Malta, Nikon Z7ii, 50mm f1.8. Shot at 50mm, f8, ISO 64, 1/250 seconds.

Sunset with a ramshackle hut in the foreground. Nikon Z7ii, 50mm f1.8. Shot at f8, ISO 64, 1/250 seconds.
Malta has a great bus network but if you’re planning sunrise and sunet shots it probably won’t help you much. I hired a car from the airport, where there is a good selection of companies with reasonable rates. The weather while I was there was not great and included a day of torrential rain and as the population is neither used to that or equipped for it I found myself behind a car whose tyres did not have enough profile to drive up a gentle hill in the rain! Driving in the centre of Valletta is not easy, even with your choice of Apple Car Play or Google Maps, so be warned. The ferry to Gozo runs 24 hours, however, so you can get a very early morning crossing to catch the sunrise locations.
Let me know in the comments if you’ve been or if you plan to go and what you thought/think.

Canonet QL 17 review and sample images
A story of me getting to grips with the Canonet QL17 film camera after well over a decade of shooting entirely digital. This post explains how I found the camera, how I got used to shooting with it and what the results from the first successfully sho roll of film were like.
Can you “rediscover” film photography if you never really discovered it in the first place? My experience of photography in my childhood amounted to nothing more than using a 110 cartridge film camera with precisely no functions or controls other than not letting you wind more than one frame at a time (a basic function that the Holga 120N lacks, but which also gives you more freedom for creative expression.
I still have many of the prints from these cameras in albums that date back to the late 1990s and early 2000s. The “unique” look of film that is so often touted by fans of “analogue” photography is certainly there, but so are the clear results of an inability to take any control of the camera, such as unwanted blur and over or under exposure.
After gaining all my knowledge and experience on digital cameras, I thought it was about time to see whether the new-found interest in analogue cameras was worth looking into. My experiments with the Holga 120N, which started from a simple desire to try out “Holgaramas” left me disappointed. You get what you pay for, which in the case of the Holga is not very much. At least as far as the camera is concerned. Buying and developing 120 film is an entirely different matter when you may only get two or three frames from a 16 shot roll that might be usable. So my attention wandered to an affordable 35mm camera with a full manual mode and I inevitably stumbled across the Canonet QL17, also known as the “Texas Leica”.
Finding a Canonet QL17
I scoured my annual second-hand photo fair in Vevey, Switzerland and found precisely zero Canonets. The best place to look if you are serious is on Ebay, where second-hand cameras are big in Japan. All the listings are by professional companies that deal solely in second-hand camera gear and have their own temperature controlled warehouses. They have a clear grading scale so that you know the condition of what you are bidding on before you start looking at the photos. I would recommend taking a good look at the product shots, however, as there may be a tiny defect visible on the camera or the lens (although this is usually indicated).
You’ll find a choice of the original steel housing with exposed brushed steel or an all-black version. I opted for the latter in a near-mint version, which cost me around 200 Swiss francs plus delivery and a further 20-30 francs of import duty for which I received a separate invoice from Fedex a few weeks after buying the camera. It came well-sealed in a protective packaging and is in pretty good condition.
Using the canonet QL17
After watching some Youtube videos and given that the QL in the Canonet QL17 stands for “quick load”, I thought that using the camera would be easy. Perhaps it is for someone who has a bit more patience and common sense than me but I ended up ruining the first two rolls of film I shot; the first by not pressing the button on the underside of the body before rewinding the roll and then wondering what that horrible tearing sound was; the second by somehow not even managing to load the film correctly.
Once you’ve got the hand of loading and unloading film, there is not much more you need to know. Set the film speed using the finnicky switch on the lens and you’re good to go. You can get an expensive adapter so that you can use pen cell batteries for the auto exposure mode, but where’s the fun in that? I tried to stick to the “Sunny 16” rule for my first few rolls, using the reciprocal of the film speed at f16 in sunny conditions, then stepping down according to the light. The big challenge here is determining what is actually sunny and what isn’t (see the sample photos below). I’m used to shooting digital on a tripod, so long exposures are my thing, which meant it took some getting used to the more limited range of shutter speeds.
The rangefinder focussing was also something new for me but it’s pretty intuitive: move the focus ring to line up the centre image with the surrounding image and bingo! Or, unless you are shooting something quite close up and with a large depth of field, just leave it on infinity.


